Building your own diving light
I found this description at a french homepage (CVS) and translated it into english. If you look at the original you will probably find some differences, because my french isn't quite good. The comments at the end are no criticism, just some thoughts. I never saw the finished light.
Material | Construction | Switch | Comments | back to other people projects | back to homepage
To build your own light is easy and cost effective. There are several solutions. We propose the most simple and reliable solution. The price you have to pay is a large dimensions... but underwater that is not as much a problem. Our light has been tested down to 35m, so far it works...
Material:
The costs of the material are about 400FF (800ATS), the prices noted for each part are approximative.
- Two muffs of PVC (connection for waste water tubes) inner diameter 125mm (30ATS)
- 50cm PVC waste water tube outer diameter 125mm D125
- an endcap for screwing D125 (for waste water tubes) (60ATS)
- Plexiglas plate 5mm thick, 150x150mm
- Metal plate (Alu) 150x150mm
- an O-ring sealing quality PB701(?), 113,9x3,53 (240ATS ?)
The electric material
- a leadacid battery 12Volt, 3-6Ah (more Ah means longer burning time) (240-300ATS ?)
- a reflector bulb 50W (or 20W depending on the brightness needed) 12V together with a socket and build-in set for the ceiling (200ATS)
- 1 meter pliable flex with 1,5mm2 area, terminals to connect the wires
- an encapsulated flip switch.
- a magnet 25x10x5mm
- a charging device
various
- neoprenefoam (to hold the battery in the body)
- a small piece of PVC-tube (diameter about 1,5cm)
- a large tube of PVC-glue, a small tube of neoprene-glue
Construction of the housing
Cut a disc with 125mm diameter out of the plexiglas. Be sure it fits closely into one of the muffs. Cut another disc of 125mm out of the alu plate. In the middle of this disc cut a hole to fit the build-in set. Mount this set and fix it with two bolts to the metal plate.
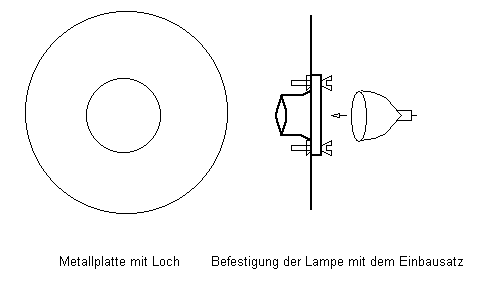
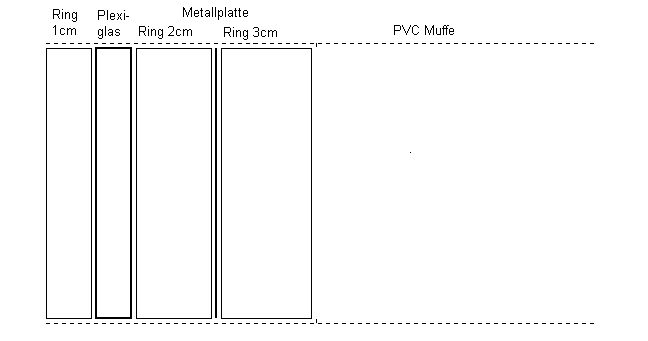
Cut 2 rings with 3 and 2,5cm from the PVC-tube D125. Glue the ring with
3cm into the one muff next to the middle of the muff. Fit the metal plate
into the muff and glue it onto the ring. Then comes the second ring to
fix the plate between. Glue the Plexiglas plate onto the second ring (for
some models we used silicon glue to fix the plate to the tube, that will
do, too). Cut a third ring (about 1cm but better take an exact measurement)
and glue it onto the Plexiglas to fix the outermost disc between two rings.
Don't hesitate to use a lot of glue to ensure a good seal.
Cut a 14cm piece of the D125 PVC-tube, cover it with a lot of glue and push the two muffs onto the tube (the two muffs have to meet in the middle of the tube).
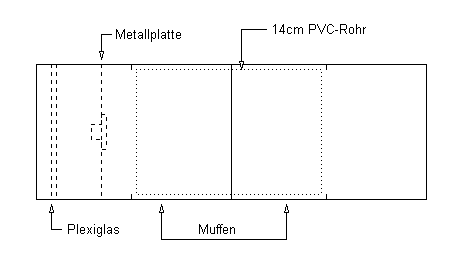
Glue the screw endcap at the end of the housing
The Switch
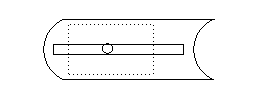
The principal is as follows: a seesaw is located in the inside of the housing, both ends being of iron. A magnet can slide at the outside and depending on the position attract one of the ends. Take the switch and remove the mainpart (the small platform with the contacts and the seesaw). Drill a small hole between the contacts and put a small tack through it to hold the seesaw.
Glue or solder a small piece of iron to both ends of the seesaw. Glue the whole thing onto the inside of the housing where it is not to thick. Cut the small tube in two halves and apply a crevice along the upper side of the half. Glue it to the outside of the light above the switch. The magnet is positioned inside the half tube, where it can be moved.
You can get a better magnetic switch by using a relais and a reed contact (ILS). Both parts are available in any good electronics store. The parts are connected as follows:
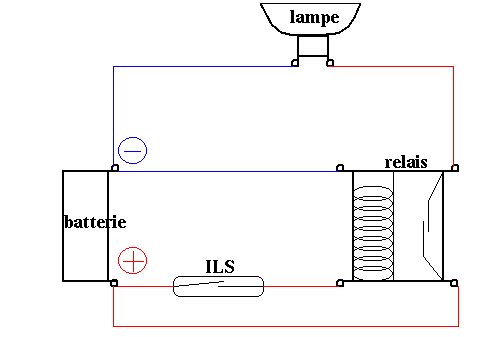
The relais switches the main current. It is controlled by the reed contact
which is closed when a magnet is near.
Little remains to do. The neoprene foam covers the inside of the housing to fix the battery. Connect the switch with the socket of the bulb and the battery and put the bulb into the build-in set where it is fixed with the ring bought with it. (Attention: the bulb is mounted reversed to its normal use.) Put the O-ring at the place of the old rectangular sealing and screw the end cap firmly in (attention: the sealing has to be pressed quite firmly). It is possible that the light has some positive buoyancy (it depends upon the weight of the battery). If that's the case, search something to give some additional weight. You can find all of the material in hardware stores and electric supply. The O-ring is somewhat more difficult to find. Ask in special tool stores which may have pneumatic or hydraulic accessories or in rubber stores.
And now take the glue tubes and good luck!
Comments:
- The construction is quite simple but I think limited in working depth. The statement 35m are the maximum to my feelings. PVC-waste water tubes are relativly weak, so is Plexiglas with 5mm thickness. Only the use of two tubes above one another gives some more stiffness. Perhaps the PVC-glue compensates for some torsion.
- To me it's not clear how the O-ring is located, I think it's an axial sealing. Is the surface and the recess appropriate ?
- The construction of the switch seems interesting. It combines the advantages of an reed contact with those of a switch which can conduct a high current. On the other hand the reed contact with an relais is not much more expensive and easier to use.
- The mounting of the magnet at the outside seems quite practical. A tack which looks out of the tube is not mentioned. Don't forget a transportation lock !
- Where is the handle ? Maybe a construction as I used at my light no. 1 .
- PVC-tubes to keep the distance and a build-in set are a good idea.
Material | Construction | Switch | Comments | back to other people projects | back to homepage