Scuba - do it yourself , complex projects
Content:
Only "small" projects will be described here. Nobody can expect to find an instruction for building a regulator. Though you can construct a lot with a small sortiment of tools. Most of the tools used can be found at better equiped homeworkers. I although could use an old lathe from time to time. The works described here may seem rude or primitive to professionals, but this is more dedicated to the interested homeworker. Any correction or advice is desired.
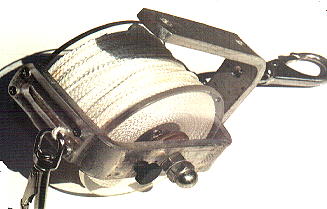
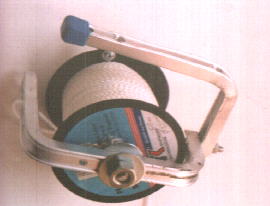
Reel
 Because
the reels available in Austria (e.g. DiveRite)
are quite expensive (700 ATS and more), I thought making one on my own
shouldn't be a problem. The construction of most reels is really simple.
A spool with a rope and a knob put up to rotate it, are fixed at a U-type
metal piece. The rope is lead through a rectangular opening at one of the
thighs an knoted to a snap hook. Another L-type metal piece makes the handle.
A screw with a big rotating knob is pressing at the reel to control the
unwinding.
Because
the reels available in Austria (e.g. DiveRite)
are quite expensive (700 ATS and more), I thought making one on my own
shouldn't be a problem. The construction of most reels is really simple.
A spool with a rope and a knob put up to rotate it, are fixed at a U-type
metal piece. The rope is lead through a rectangular opening at one of the
thighs an knoted to a snap hook. Another L-type metal piece makes the handle.
A screw with a big rotating knob is pressing at the reel to control the
unwinding.
 The
length of the rope varies depending on the use of it. For cavediving you
have different types of reels with 20m to 300m of rope. For wreckdiving
you need only short length. The thickness should be 2-4mm. I chose 3mm
rope from a hardware store in pieces of 50m. Because I wanted more than
50m I connected two leads in a way the thickness remains constant to avoid
problems when unwinding. To get a rope in one piece you will have to buy
much more length. Markings on the rope (distance, direction) are useful.
The
length of the rope varies depending on the use of it. For cavediving you
have different types of reels with 20m to 300m of rope. For wreckdiving
you need only short length. The thickness should be 2-4mm. I chose 3mm
rope from a hardware store in pieces of 50m. Because I wanted more than
50m I connected two leads in a way the thickness remains constant to avoid
problems when unwinding. To get a rope in one piece you will have to buy
much more length. Markings on the rope (distance, direction) are useful.
 For
the first modell I used the reel on which the rope is when I bought it.
But these reels are made from weak material or have the wrong measures.
So I started building one. I took Perspex(?) as material. It's good to
work on and strong enough. Take a bar 40mm in diameter and 7cm long. Of
course you can change the measures at your wish. Now drill throug the bar.
This process is critical. First you need a long drill with 10,5mm diameter.
Second this drilling has to be very much in the middle. That's best accomplished
with a lathe. Another way is to fix the bar very accurately and then drill
with a tripod(?)drill. The half way from either side.
For
the first modell I used the reel on which the rope is when I bought it.
But these reels are made from weak material or have the wrong measures.
So I started building one. I took Perspex(?) as material. It's good to
work on and strong enough. Take a bar 40mm in diameter and 7cm long. Of
course you can change the measures at your wish. Now drill throug the bar.
This process is critical. First you need a long drill with 10,5mm diameter.
Second this drilling has to be very much in the middle. That's best accomplished
with a lathe. Another way is to fix the bar very accurately and then drill
with a tripod(?)drill. The half way from either side.
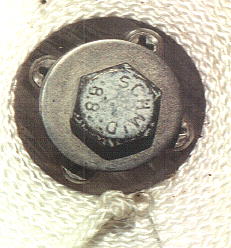 Then
you cut two discs of 5mm Perspex with 114mm diameter and drill through
the center with 10,5mm. To give the discs a smooth outside put them together
fix them with a screw and nut. Thighten the screw int the drill and sand
the discs at moderate speed. The discs will be fixed to the bar with small
4mm screws. For the rotating knob I used two small pipes which are mounted
at the spool with a screw. The pipe on the outside is a bit smaller and
can rotate. The one on the inside is fixed.
Then
you cut two discs of 5mm Perspex with 114mm diameter and drill through
the center with 10,5mm. To give the discs a smooth outside put them together
fix them with a screw and nut. Thighten the screw int the drill and sand
the discs at moderate speed. The discs will be fixed to the bar with small
4mm screws. For the rotating knob I used two small pipes which are mounted
at the spool with a screw. The pipe on the outside is a bit smaller and
can rotate. The one on the inside is fixed.
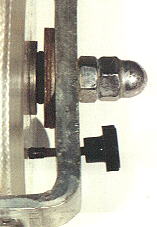
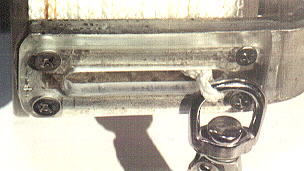 An
alu-bar with an rectangular shape is used for the U-type frame. Bend it
in a vice. The opening for the rope will be best if you have a milling
cutter. Some drills and filing it smooth will have the same effect. Then
drill and make a thread for the axle in the middle of the alu part. A screw
with discs and an O-ring gives a certain amount of braking when unwinding.
Another thread next to the axle takes a screw whick blocks the unwinding
when not in use. To protect the Perspex discs give contracting hose on
the end of the screw. Now fix the L-type part with a screw and the main
work is done. Drill some holes into the handle for mounting the reel with
a rope. I also mounted a carabiner with a small eye.
An
alu-bar with an rectangular shape is used for the U-type frame. Bend it
in a vice. The opening for the rope will be best if you have a milling
cutter. Some drills and filing it smooth will have the same effect. Then
drill and make a thread for the axle in the middle of the alu part. A screw
with discs and an O-ring gives a certain amount of braking when unwinding.
Another thread next to the axle takes a screw whick blocks the unwinding
when not in use. To protect the Perspex discs give contracting hose on
the end of the screw. Now fix the L-type part with a screw and the main
work is done. Drill some holes into the handle for mounting the reel with
a rope. I also mounted a carabiner with a small eye.
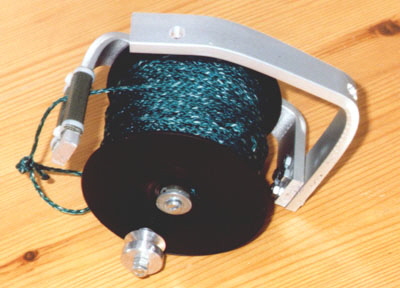
Matthias Heinrichs sent my this picture of his reel.
The spool is the one, the line was sold on. I just took 25m of the 100m off the spool to get a better handling. The knob is some old part from an ancient impact printer. The handle is made from alu profile (can be bought in a hardware store). The long hole for the line is fitted with tape to safe the line. On both sides are cable ties for the same reason. And at last something important: pull the complete line off and secure the ending :-)
Simple Reel
And now some "quick-and-dirty" instructions for building a reel. I don't recommend it for long and deep cave penetration, but for training and simple dives it will do.
 The frame is made of alu profile which you can find in hardware stores
to hang something on a wall. You can bend it easily in a vice. A bolt with
nut connects both parts. Some holes serve for mounting. A longish hole
leads the rope. Use a milling cutter, an angle grinder or otherwise drill
holes next to each other and connect them with a file.
The frame is made of alu profile which you can find in hardware stores
to hang something on a wall. You can bend it easily in a vice. A bolt with
nut connects both parts. Some holes serve for mounting. A longish hole
leads the rope. Use a milling cutter, an angle grinder or otherwise drill
holes next to each other and connect them with a file.
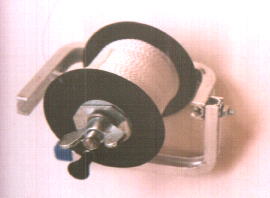 The reel is put on a M8 thread pole. A thread in the frame is useful but
not necessary. The force needed to unroll the rope is controlled by a spring
ring and a wing nut pressing onto it. To avoid interference with the reel
grip I filed the wing nut at the ends. The thread pole is flattened and
a metal plate with a matching hole stops the wing nut from rotating with
the reel. Some wire through a hole in the thread pole fixes the wing nut.
The reel is put on a M8 thread pole. A thread in the frame is useful but
not necessary. The force needed to unroll the rope is controlled by a spring
ring and a wing nut pressing onto it. To avoid interference with the reel
grip I filed the wing nut at the ends. The thread pole is flattened and
a metal plate with a matching hole stops the wing nut from rotating with
the reel. Some wire through a hole in the thread pole fixes the wing nut.
 The longish hole should be protected with some tape to minimize the strain
on the rope. As reel is taken the reel the rope was sold on (2-3mm, 50m).
As reel grip we use a furniture knob. The parts cost shouldn't be more
than 150 ATS.
The longish hole should be protected with some tape to minimize the strain
on the rope. As reel is taken the reel the rope was sold on (2-3mm, 50m).
As reel grip we use a furniture knob. The parts cost shouldn't be more
than 150 ATS.
Diving scissors
 Recently scissors instead of knives get popular. To cut a line it's surely
a good alternative. But the commercial models were to expensive for me.
700ATS the more expensive one, still 270ATS for the cheaper one. This one
gave the model I copied mostly. You need a webbing belt 50mm wide and about
1m in length, 7cm velcro 50mm wide and a scissor like the one on the picture.
Recently scissors instead of knives get popular. To cut a line it's surely
a good alternative. But the commercial models were to expensive for me.
700ATS the more expensive one, still 270ATS for the cheaper one. This one
gave the model I copied mostly. You need a webbing belt 50mm wide and about
1m in length, 7cm velcro 50mm wide and a scissor like the one on the picture.
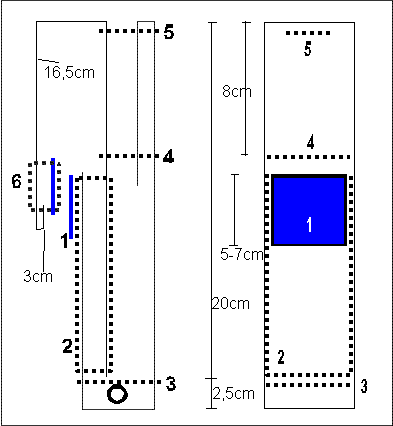
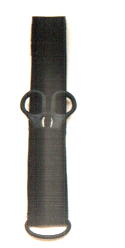
There are two pieces of webbing belt, one of them a bit longer. The exact measures depend on the scissors. The rough part of the velcro is sewed onto the end of the longer piece (1). Then make an u-type seam which connects the two pieces and forms a pocket for the scissors (2). There is a place at the lower part for a plastic D-ring or an O-ring which is held by he seam (3). Seam (4) forms a loop to hold a strap. Seam (5) isn't necessary but gets a better hold. At last fold the remaining part at the end and sew the smooth part of the velcro (6). The measures at the plan are for one of the usual EMT scissors (other than at the pictures).
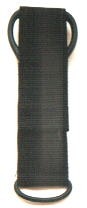
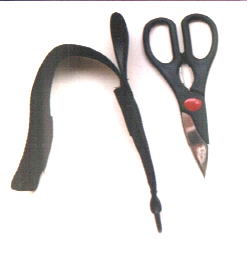 You can wear the scissors with two straps like a diving knive. Of course
the scissors have to be stainless. Nevertheless it's good to use some grease
for protection.
You can wear the scissors with two straps like a diving knive. Of course
the scissors have to be stainless. Nevertheless it's good to use some grease
for protection.
One of the commercial scissors has got a cord to secure the scissors. But I think that would hinder the use.
Buoy
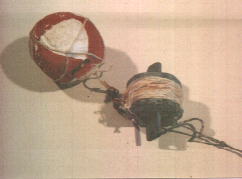 This
is a marker buoy to fix a point underwater. I painted a styropor ball and
knoted a coarse net around it to put a rope on it. The reel consists of
to brass parts solded together. Two tacks for fixation and to put the ball
on. I painted the whole thing with zinc paint. The reel serves as weight
and holds about 50m thin nylon rope. A rubber band holds the ball on the
reel.
This
is a marker buoy to fix a point underwater. I painted a styropor ball and
knoted a coarse net around it to put a rope on it. The reel consists of
to brass parts solded together. Two tacks for fixation and to put the ball
on. I painted the whole thing with zinc paint. The reel serves as weight
and holds about 50m thin nylon rope. A rubber band holds the ball on the
reel.
If you have the material it's a nice homework, but otherwise the fabricated
ones are the better solution.
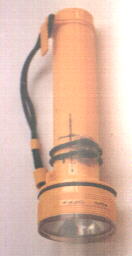
Normal flashlight
Perhaps you thought about using a normal, cheap non-scuba flashlight for scuba. Most watertight ones are switched on by screwing the light head. These lights work OK as long as you are careful with the seals. But you shouldn't switch them underwater.
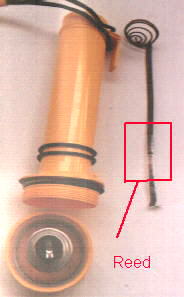 So I added a switch. I cut the metal strip which leads to the lower battery
contact and soldered a flat reed contact to the two ends. However it had
to fit properly into the groove at the inside of the light. At the outside
a magnet is glued to two O-rings. To switch the light on, you put the magnet
in the right position.
So I added a switch. I cut the metal strip which leads to the lower battery
contact and soldered a flat reed contact to the two ends. However it had
to fit properly into the groove at the inside of the light. At the outside
a magnet is glued to two O-rings. To switch the light on, you put the magnet
in the right position.
But there are some serious disadvantages:
- You have to be careful when loading the batteries not to damage the reed contact.
- It's not easy to find the right position to switch on.
- Most reed contacts especially with high currents get "stuck", which means even when the magnet is taken away the contact remains closed. You have to knock at the light to switch it off.
For these reasons I don't use my lights of that kind anymore. Even the
better price is nearly gone. This light costs about 100-150ATS while a
light with switch by a scuba-supplier is under 300ATS.
back to start | reel | simple Reel | diving scissors | buoy | normal flashlight | back to homepage
e-mail:bastel.stube@gmx.net