Accumulators
I don't have all lights in use right now. The other ones are either under construction or just planned or will not be finished. These descriptions are not meant to be followed exactely but as inspiration for your own construction (mail me when finished !)
Here are the accumulators for the two piece versions. There isn't always a casing. The advantage over a single piece light are: you can use quite large accus with good handling. You can exchange the accus. The disadvantages are: there has to be a cable from lighthead to accu, which may come in the way. There are more sealings and it's more complicated to build in most cases.
- 1st accumulator ("open" accu, contacts
sealed)
- 2nd accumulator (very big canister)
- 3rd accumulator (big accu, sealed in resin)
- 4th accumulator (waste water tubing)
- 5th accumulator (hose material)
- 6th accumulator (plexiglas canister)
- 1st diving light (tubular light of PE)
- 2nd diving light (Plexiglas rectangular)
- 3rd diving light (Plexiglas, small, unfinished)
- 1st lighthead (of Plexiglas)
- 2nd lighthead (Devpein hand torch)
- 3rd lighthead (pressure tight canister)
- 4th lighthead (tubing, resin)
- 5th lighthead (Maglite)
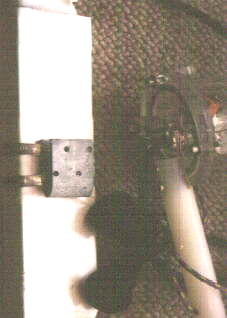
1st accumulator ("open" accu, contacts sealed)
I chose two lead-gel-acid batteries with 6V/3,2Ah. These batteries are
sealed to a large extent. I sealed most joins with two-comp-glue additionally.
The cables are directly soldered to the connectors and sealed with the
same glue. Some pieces of tape give a kind of working shape. To control
the sealing lay the battery in salt water and measure the voltage between
the water and the cables with the help of a sensitive voltmeter (DVM).
Normally the value should be zero. If not you can measure the current.
If it has a certain amount there is a bigger problem. If it is not you
have only a small leak somwhere which can nevertheless lead to a defect
battery after some time (shit happens!). The general opinion states that
you must not charge an accu in a sealed environment because it is possible
that hydrogen gas develops. But if you use a voltage and current controlled
charger nothing should happen. At least I had no problems until now. I
glued the batteries with their smallest side to one another and fixed them
with tape. As protection there is also shrinking tube around the batteries
with an additional layer where the mounting will be placed. The cable is
secured with tape and 2-comp-glue against pull where it leaves the battery.
The mounting consists of an U-type metal plate fixed with steel collars.
The unit is hooked onto the tank strap at the jacket. Male and female pressure
tested sockets connect the cables from battery and torch. I use KSS-sockets
(Devpein) which are easily availabe and fulfill IP68 (10bar). A loose socket
with a piece of cable is used when charging.
2nd accumulator(large canister)
To get a real strong battery canister (2x6V/12Ah) a large tube and also exactly fitting caps were machined on a CNC-machine of a solid piece of plastic. Unfortunately there were some discussions about the right construction of the sealing which lead to no success. So it wasn't possible to get that thing water tight and in the end the project was abandoned. The large canister would have been quite light in the water, but out of the water the weight would have required a strong constitution.
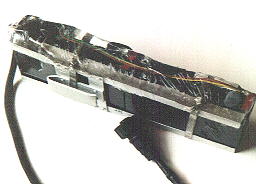
3rd accumulator(big accu, sealed in resin)
The
accumulators of no.2 are now used more or less "open". I built
a kind of aluminium frame that surrounds the accus to get a better hold.
There is also an U-type part which is stuck under the BC-belt. Then every
electrical contact is sealed with polyester resin.
Be careful ! epoxy resin is better. The resin I used didn't connect
so firm with the accu, therefore some water got to the contacts. So I poured
resin over the complete accu to get a complete coating.
 I
also made a jacket to secure the accu and the rest of the equipment. A
belt around the tank helps to get a firm hold of the accu.
I
also made a jacket to secure the accu and the rest of the equipment. A
belt around the tank helps to get a firm hold of the accu.
4th accumulator (waste water tubing)
This project could be one of the cheapest ways to build an accu canister.
First the idea as it came to my mind: you take a piece of waste water tubing which is sealed with glue at one of the endings. The other ending gets a feed through for the cable. The single NiCd cells are connected by short cables. This tubing is weak and doesn't withstand pressure. To overcome that the remaining space is filled with fine sand and the cap is glued in a way that a repair can be done easily. The aparatus is fixed to the equipment with belts or steel collars.
 In
fact I used grease instead of the sand and used a normal cap with its original
sealing. Don't wear new clothings ! Unfortunately that didn't work. There
still seems to have been air in it which is pressed together and water
flow in.
In
fact I used grease instead of the sand and used a normal cap with its original
sealing. Don't wear new clothings ! Unfortunately that didn't work. There
still seems to have been air in it which is pressed together and water
flow in.
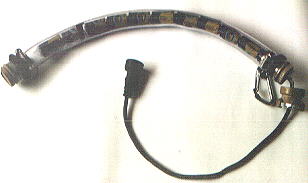
5th accumulator (hose material)
And
now a solution which really works. The accumulators are in a water hose.
I used 5/4" type, because that was the largest I found at the hardware
store. It's not large enough for mono cells but baby cells do fine. You
should connect the cells mechanically, webbing adhesive tape would be good.
The left ending is closed with a blind cap that is fixed by a steel collar.
Another collar holds a ring to fix it at the equipment. I couldn't find
a closed cap, so I cut a piece of brass and soldered it with silver solder.
You could use the same type for the right side. But I used a screwable
part with an opening wide enough for the cells for easy servicing. The
cable is lead through a feed through.
If you go deeper the hose is pressed together. There should be little
air in it to avoid sharp bends. There haven't been problems down to 45m.
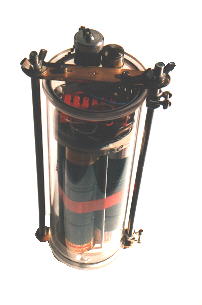
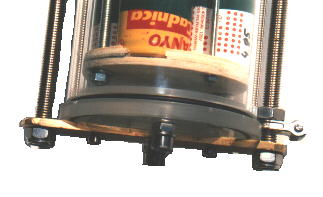
6th accumulator (plexiglas canister)
The basic construction is similar to the first light, but now plexiglas is used for the tube and there are only 2 thread poles.
The
tube (length 24cm, diameter 80/90mm) should be cut a little longer then
you think is necessary, because you will probably need more space in the
end. I let the parts machine off on a lathe and grinded them with fine
sandpaper (600-1000 wet).
 I
cut the caps (thickness 15mm, 90/80mm diameter) roughly with a prick saw
out of a persplex plate and let them machine off on a lathe to the exact
measures. The smaller part of the cap should sit tight inside the tubing,
the other measures aren't critical. The work at the parts for two canisters
costed me only 250ATS. The caps are also grinded with sandpaper to get
a good sealing with two O-rings (about 78x3/3.5).
I
cut the caps (thickness 15mm, 90/80mm diameter) roughly with a prick saw
out of a persplex plate and let them machine off on a lathe to the exact
measures. The smaller part of the cap should sit tight inside the tubing,
the other measures aren't critical. The work at the parts for two canisters
costed me only 250ATS. The caps are also grinded with sandpaper to get
a good sealing with two O-rings (about 78x3/3.5).
 A
piece of brass rod is bolted to the cap by two M4-bolts. I took brass because
it can easily be cut and it doesn't corrode so fast. But the connection
stainless steel to brass is a problem. stainless steel alone would do fine.
Two thread bars M8 press the cap onto the tube. They are fixed in threads
with nuts at the lower part. At the top side it can easily be opened with
the help of two wing nuts.
A
piece of brass rod is bolted to the cap by two M4-bolts. I took brass because
it can easily be cut and it doesn't corrode so fast. But the connection
stainless steel to brass is a problem. stainless steel alone would do fine.
Two thread bars M8 press the cap onto the tube. They are fixed in threads
with nuts at the lower part. At the top side it can easily be opened with
the help of two wing nuts.
The smaller socket at the cap is for charging, the bigger one (KSS-Devpein)
is for the connection to the light head. The charging socket can be left
out. I put the two sockets at one side to get enough space for another
socket in the future. They are to near to each other unfortunately, so
I had to improvise. The sealing is achived through O-rings, which are pressed
onto the surface of the cap, when the sockets are turned into their threads.
Maybe you have to drill a sloping to get a better sealing fit. I used Loctite
Red, too, at the threads - that gives quite a good sealing if the free
space is small enough.
 I
mounted bolt snaps to the scrw rings at the thread pole to fix the canister
at the BC. You could also mount the canister with a belt to the tank. I
put two more bolts into the lower cap, so that I can stand the canister
on four points. You could use rubber buffers instead.
I
mounted bolt snaps to the scrw rings at the thread pole to fix the canister
at the BC. You could also mount the canister with a belt to the tank. I
put two more bolts into the lower cap, so that I can stand the canister
on four points. You could use rubber buffers instead.
 I
put 4 mono cells 1,2V/4Ah at a time and connected them with short pieces
of thick cable. The mechanical connection is achieved by shrinking hose.
Everything inside is mounted with two thread poles (M5), which are screwed
into the upper cap. Two wooden (plastic would do, too) discs hold the accumulators
between each other. I made four dips with a milling cutter for the cells.Two
more thinner thread poles (M3) help stabilizing the whole set. On top of
the accus there are the electronics. I used my circuit for two lights with
voltage control and softstart completed with a dimmer, which converts the
14,4V (12 cells) to 12V for the halogen bulbs. All parts as well as a fuse
are connected with a terminal. In this way you can easily change the connections.
I
put 4 mono cells 1,2V/4Ah at a time and connected them with short pieces
of thick cable. The mechanical connection is achieved by shrinking hose.
Everything inside is mounted with two thread poles (M5), which are screwed
into the upper cap. Two wooden (plastic would do, too) discs hold the accumulators
between each other. I made four dips with a milling cutter for the cells.Two
more thinner thread poles (M3) help stabilizing the whole set. On top of
the accus there are the electronics. I used my circuit for two lights with
voltage control and softstart completed with a dimmer, which converts the
14,4V (12 cells) to 12V for the halogen bulbs. All parts as well as a fuse
are connected with a terminal. In this way you can easily change the connections.
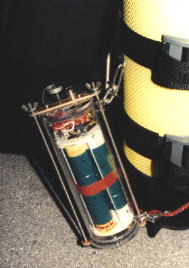 Right now I tested
it down to 50m. You can observe the O-rings well through the transparent
persplex. I used cells of different kind (manufacturer), which were tested
before. Normally you should use only one kind.
Right now I tested
it down to 50m. You can observe the O-rings well through the transparent
persplex. I used cells of different kind (manufacturer), which were tested
before. Normally you should use only one kind.
The picture shows an easy way to mount the tank to the BC.
1st diving light | 2nd diving light | 3rd diving light | 1st accumulator | 2nd accumulator | 3rd accumulator | 4th accumulator | 5th accumulator | 6th accumulator | 1st lighthead | 2nd lighthead | 3rd lighthead | 4th lighthead